
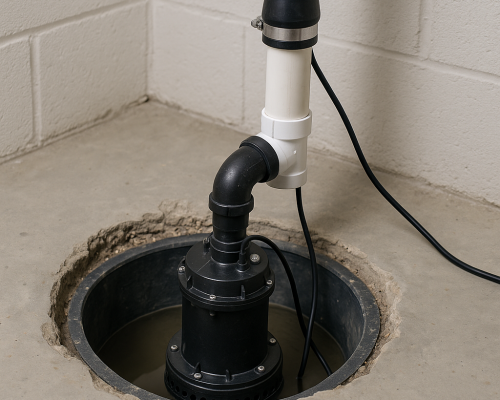
A basement that floods once is a basement that will flood again without the right protection in place. Whether you are dealing with consistent water intrusion, a waterproofing upgrade, or a first-time installation in a home that never had one, the decisions you make before the work begins determine how well the system performs for the next decade. Understanding what sump pump installation actually involves puts you in control of the process rather than just reacting to it. The details behind how water is managed and removed from a home’s lowest level matter far more than most homeowners realize until something goes wrong.
In this guide, you will learn:
- Why sump pump installation is one of the most important moisture protection investments a homeowner can make
- 7 critical things to know and prepare before installation begins
- How to choose the right sump pump type for your home and water volume
- What the installation process looks like from start to finish
- How to maintain your system after installation to protect the investment
Why Getting Sump Pump Installation Right Matters From the Start

A sump pump is not a product you set and forget. It is an active mechanical system that runs on demand, often during the worst weather conditions of the year, and its reliability depends entirely on whether it was sized correctly, installed properly, and maintained consistently after the work is done. A pump that is too small for the water volume it serves will run continuously and burn out prematurely. A pump installed without a proper pit or discharge line will fail to protect the space it was designed to defend.
For homeowners in Auburn Hills, MI and surrounding areas where spring snowmelt and heavy rain events create significant groundwater pressure against basement walls and floors, the stakes of a poorly planned installation are real. A flooded basement can cause thousands of dollars in structural damage, destroy personal belongings, and create mold conditions that are expensive and disruptive to remediate.
- Protection Against Structural Damage: Repeated water intrusion softens concrete, corrodes rebar, and creates hydrostatic pressure that cracks foundation walls over time. A properly installed sump pump removes water before it reaches the level where damage occurs.
- Mold and Air Quality Prevention: Standing water in a basement or crawl space creates the conditions mold needs to establish itself within 24 to 48 hours. A functioning sump pump keeps moisture levels low enough to prevent growth before it starts.
- Home Value and Insurability: Homes with documented water intrusion history face lower appraisal values and reduced insurability. A properly installed and maintained sump system demonstrates active water management that buyers and insurers both view favorably.
- Peace of Mind During Storm Events: A correctly sized and installed sump pump handles heavy rain events automatically, without intervention, so you are not managing buckets or monitoring the basement during every thunderstorm.
- Foundation Longevity: Consistently removing water from around the foundation extends the lifespan of the structure itself, protecting what is for most homeowners their largest financial asset.
6 Things to Know Before Your Sump Pump Installation
Preparing for sump pump installation is not just about clearing space in the basement. It involves understanding the water problem you are solving, the equipment options available, and the work required to connect the system to the home’s drainage and electrical infrastructure. Working through these seven points before any work begins results in a better installation outcome and fewer surprises during and after the project.
1. Understand the Source of Your Water Problem
A sump pump removes water that has already entered the pit, but it does not address why the water is getting there. Before installation, it is worth understanding whether the water intrusion is from surface water that is infiltrating through cracks and gaps, hydrostatic pressure pushing groundwater up through the floor, or a high water table that keeps the soil around the foundation saturated.
This distinction matters because a sump pump alone is the right solution for some water problems and only part of the solution for others. Homes with surface water intrusion through wall cracks may need waterproofing membrane work in addition to a pump. Homes with persistent groundwater may benefit from an interior perimeter drain system that channels water to the pit rather than allowing it to spread across the floor.
- Have a plumber or waterproofing contractor assess the source of water before committing to a system design
- Note whether water appears after rain events, during spring thaw, year-round, or only after extended wet periods
- Check whether neighbors have similar issues, as neighborhood-wide water table problems may require different solutions than isolated surface water intrusion
2. Choose the Right Pit Location and Size
The sump pit is the collection point for all the water the system is designed to remove, and its location and size directly affect how well the system performs. The pit should be located at the lowest point of the basement floor, away from load-bearing walls, and in a position that allows for a direct and unobstructed discharge line path to the exterior of the home.
Standard residential sump pits are typically 18 to 24 inches in diameter and 24 to 30 inches deep, though the appropriate size depends on the expected water volume and the pump model selected. An undersized pit fills too quickly for the pump to keep up during heavy events, while an oversized pit may not fill enough to trigger the float switch at the correct level during minor events.
- Confirm the pit location does not interfere with existing footings, drains, or utility lines before excavation begins
- In finished basements, the pit location affects how much finished material must be removed and replaced, which has its own cost implications
- A gravel bed at the bottom of the pit improves water collection and prevents sediment from accumulating around the pump intake
3. Select the Correct Pump Capacity

Pump capacity is measured in gallons per hour (GPH) at a specified head height, which is the vertical distance the pump must lift water from the pit to the discharge outlet. Selecting a pump based on price alone without considering capacity is one of the most common sump pump installation mistakes, and it results in a system that cannot keep up with the water volume during the events it was installed to handle.
For most residential installations, a pump rated between 2,000 and 3,000 GPH at the required head height is appropriate, though homes with significant water intrusion history, large basements, or interior perimeter drain systems feeding the pit may need higher capacity. A plumber familiar with the property and its water history can recommend the appropriate capacity based on real conditions rather than a generic estimate.
- Never select a pump based on horsepower rating alone, as pumps with identical horsepower ratings can have significantly different GPH capacities depending on their design
- Consider the total head height carefully, as a pump rated at 3,000 GPH at five feet of head may only deliver 1,500 GPH at ten feet
- In areas with frequent power outages during storms, pump capacity should be evaluated in the context of what the backup system can handle as well
4. Plan for a Backup System
The most common time a sump pump is needed is also the most common time the power goes out: during a severe storm. A primary pump without a backup system leaves the basement completely unprotected the moment the power fails, which can be precisely when water intrusion is at its worst.
Battery backup sump pumps sit alongside the primary pump in the pit and activate automatically when the primary pump loses power or fails to keep up with water volume. They run on a marine-grade battery that must be maintained and replaced on a schedule, typically every three to five years. Water-powered backup pumps are an alternative for homes with adequate water pressure that eliminates the battery maintenance requirement, though they depend on municipal water pressure remaining stable during the same storm that is causing the flooding.
For homeowners in Auburn Hills, MI and surrounding areas where spring storm events can bring both heavy rain and power outages simultaneously, a battery backup is not an optional upgrade. It is a fundamental part of a reliable installation.
5. Understand the Discharge Line Requirements
The discharge line carries water from the pump out of the home, and its routing, diameter, and termination point all affect how well the system performs and whether it creates new problems in the process. A discharge line that terminates too close to the foundation can allow the same water the pump just removed to re-enter the pit within minutes, forcing the pump to run continuously in a cycle that wastes energy and accelerates wear.
Discharge lines should terminate at least ten feet from the foundation and should slope consistently downward to the termination point with no low spots that allow water to sit in the line between pump cycles. In cold climates, the exterior portion of the discharge line must be sized and positioned to prevent freezing during winter, as a frozen discharge line backs water up into the pit and can allow it to overflow.
- Install a check valve on the discharge line to prevent water from flowing back into the pit when the pump shuts off
- Confirm local codes regarding acceptable discharge locations, as some municipalities prohibit discharging directly to the storm sewer or street
- Use rigid PVC pipe rather than flexible corrugated tubing for the discharge line wherever possible, as corrugated tubing accumulates sediment and is more prone to freezing
6. Confirm the Electrical Requirements
A sump pump requires a dedicated electrical circuit with a ground fault circuit interrupter (GFCI) outlet, as it operates in a damp environment where electrical safety is critical. Most residential sump pumps run on standard 120V household current, though larger commercial-grade pumps may require 240V.
The dedicated circuit requirement is not optional. Running a sump pump on a shared circuit risks tripping the breaker at the exact moment the pump needs to run, and doing so without GFCI protection creates an electrocution hazard in a space that routinely contains standing water. If the basement does not have a properly configured electrical outlet in the right location, electrical work is part of the installation scope and should be planned accordingly.
- Confirm the outlet location relative to the planned pit location before finalizing the installation plan
- The electrical panel should have capacity for a dedicated circuit before installation begins
- If a battery backup system is being installed, its charging requirements also need to be factored into the electrical plan
Choosing the Right Type of Sump Pump
Not all sump pumps are designed the same way, and the type that is right for your home depends on your pit size, water volume, available space, and maintenance preferences. Here is how the most common residential sump pump types compare:
Submersible Sump Pumps
Submersible pumps sit entirely inside the sump pit, submerged in water during operation. They are quieter than pedestal pumps, handle debris-laden water better, and are less obtrusive since the entire unit is below floor level. Submersible pumps tend to have shorter service lives than pedestal pumps because their motors are always exposed to a damp environment, but they are the preferred choice for most residential installations due to their performance and noise characteristics.
Pedestal Sump Pumps
Pedestal pumps have the motor mounted on a vertical shaft above the pit, keeping it dry and accessible during operation. This design extends motor life because the motor is never submerged, making pedestal pumps a good choice for narrow pits that cannot accommodate a submersible unit or for homeowners who prefer easy access to the motor for maintenance. The tradeoff is that they are louder during operation and the above-pit motor makes them more visible in the space.
Battery Backup Pumps
Battery backup pumps are secondary units designed to operate when the primary pump loses power or is overwhelmed by water volume. They are typically lower capacity than the primary pump and are not intended to replace it but to bridge the gap during power outages or extreme events. Maintaining the battery on the schedule recommended by the manufacturer is the most important maintenance task for this system type.
Combination Units
Combination pump systems integrate the primary pump and battery backup into a single unit, simplifying installation and ensuring the backup system is always properly positioned relative to the primary pump. They are a practical choice for new installations where both systems are being installed at the same time and where pit space is limited.
What to Expect During and After Installation

Knowing what the installation process looks like helps you prepare the space, set realistic expectations for the timeline, and understand what the finished system should look like when the work is complete.
During Installation
A typical residential sump pump installation involves breaking through the concrete floor to excavate the pit, installing a pre-formed pit liner, setting the pump at the correct height within the liner, running the discharge line to the exterior, connecting the electrical circuit, and backfilling and patching the concrete around the pit. The process typically takes between four and eight hours for a straightforward installation without significant complications.
Homes that require an interior perimeter drain system in addition to the pump involve more extensive excavation along the perimeter of the basement floor, which adds time and cost but produces a more comprehensive water management solution.
After Installation
Once the system is installed and operational, test it by pouring water directly into the pit until the float activates and the pump removes the water. Confirm the discharge is exiting at the correct location and at a sufficient distance from the foundation. Note the pump cycling behavior under test conditions so you have a baseline for comparison during future maintenance checks.
For homeowners in Auburn Hills, MI and surrounding areas who have just completed a sump pump installation, setting a reminder for annual maintenance checks, battery replacement on the backup system, and discharge line inspection at the start of each spring season keeps the system performing reliably for years without surprise failures.
Get Your Sump Pump Installed the Right Way the First Time
Sump pump installation is not a project where cutting corners pays off. A system that is undersized, improperly discharged, or missing a backup component will eventually fail under exactly the conditions it was installed to handle, and the cost of that failure almost always exceeds what proper installation would have cost from the start.
The seven things to know above give you the foundation to approach the project with clarity and confidence, whether you are managing a contractor doing the work or trying to understand the scope before the first conversation. When it is time to move forward, Rolls Mechanical brings the licensed plumbing expertise and hands-on installation experience that homeowners throughout Auburn Hills, MI and surrounding areas rely on for water management solutions that actually perform. Contact us today to schedule a consultation and find out exactly what your home needs before a heavy rain makes that decision for you.